Friday 28 June 2013

Fondant Carrot Cupcake Toppers

In my last post, carrot and cream cheese cupcakes, I promised I would show how to make the fondant carrots that I used to decorate my carrot cupcakes. These carrots are super cute and a great way to use any small spare bits of fondant that you have left over from a previous project. 


Firstly you need to use gel food colouring to colour some of your fondant orange and some green. Remember to keep any fondant that you are not currently working with wrapped in cling film so that it does not dry out. When working with fondant, if you do not have modelling tools (I am very excited because I just bought some for myself!) then keep a toothpick to hand to add fine details. 

Making fondant carrots is fairly simple. Begin by dividing the orange fondant into small balls, roll these balls into cone shapes. Whilst the orange fondant is still soft use the toothpick to mark horizontal lines across the cone and also to make a small hole at the top of the cone. Next use your green fondant to make tiny tear drop shapes. 


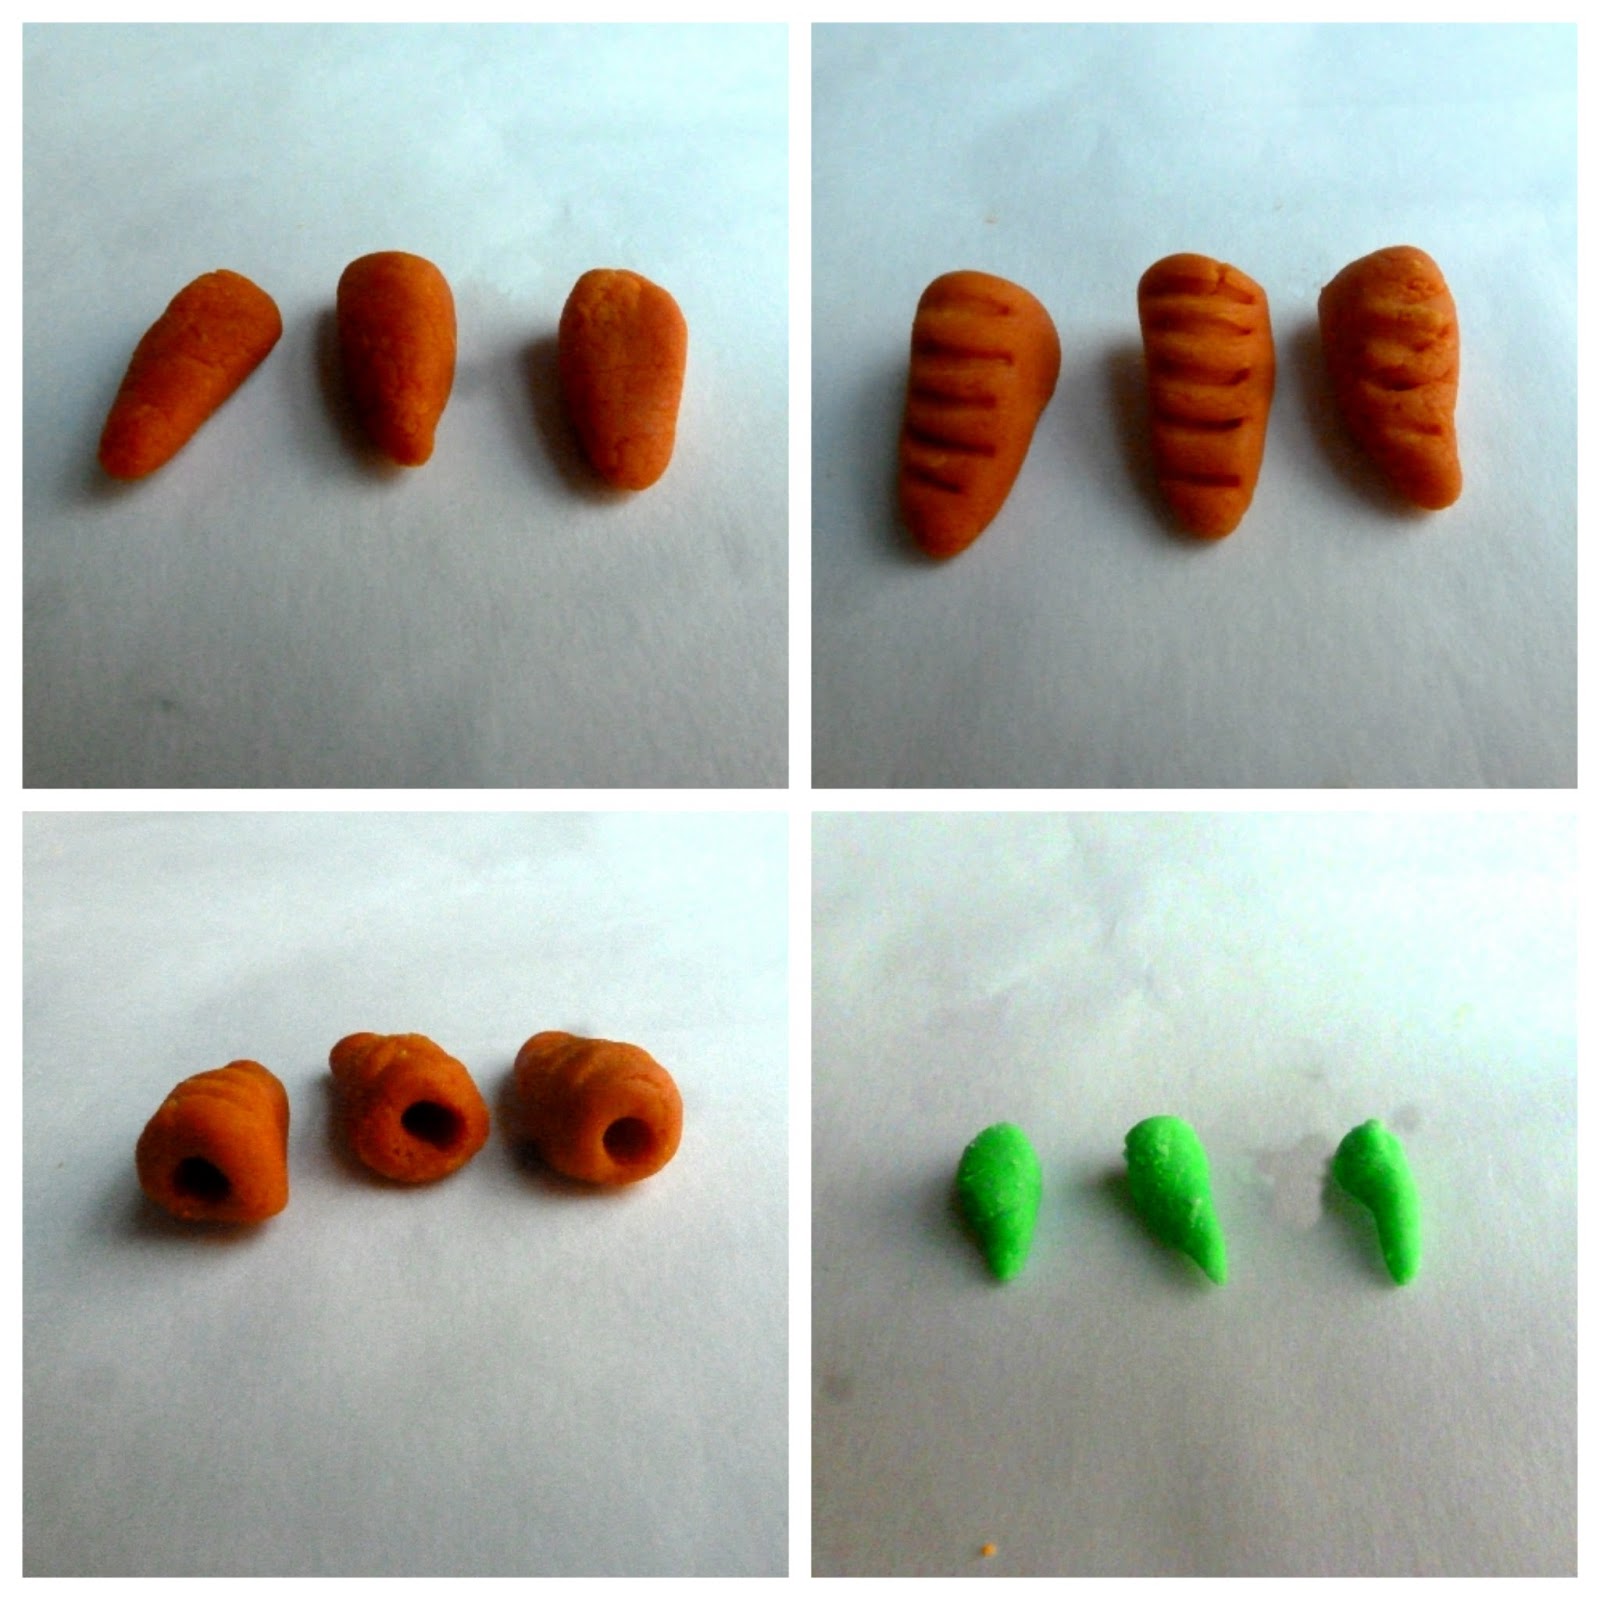
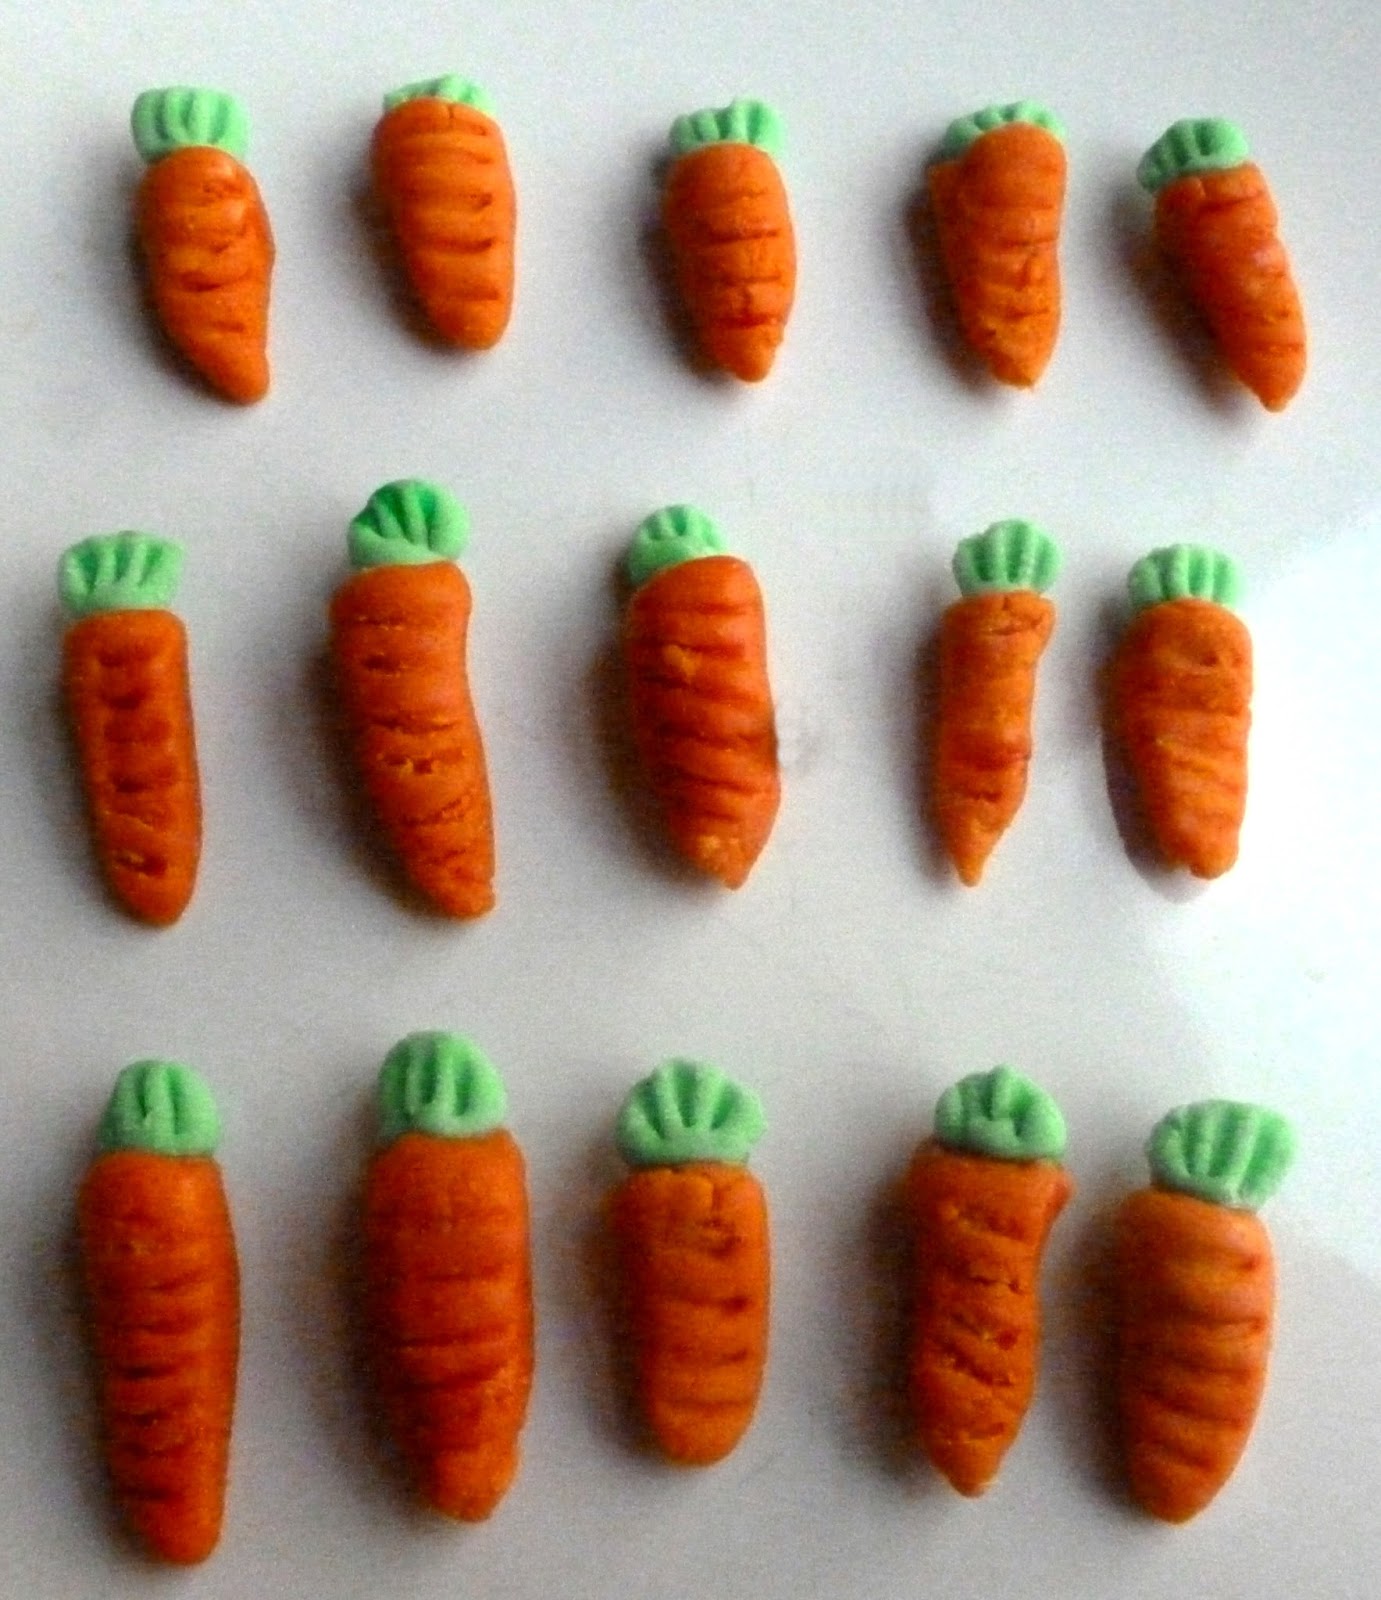
Dip the green tear drop into some edible glue (I use tylose powder) and insert into the hole made at the top of your orange cone. Leave to dry for a few minutes and then use your toothpick to mark horizontal lines in the green fondant in order to resemble leaves. Your fondant carrots should now hopefully look a bit like this: 


If you have been super organised and made your fondant carrots in advance then store in a cool dark place until you have made some delicious carrot cake that needs decorating.


Happy baking xxx

For more ideas for fondant cupcake toppers check out these fondant mortar boards

Friday 21 June 2013

Carrot and Cream Cheese Cupcakes

These carrot cupcakes are a big favourite of my housemates and there was a lot of excitement when they heard I was cooking them again. I think in the cupcake form carrot cake is even more moist and delicious than it is as a large cake hence why they are so popular. This recipe is a combination of several carrot cakes that I have made and is super yummy. 


To make 12 of these beauties you will need:

175g brown muscovado sugar
200g self raising flour
1 tsp bicarbonate of soda
2 tsp mixed spice
zest and juice of 1 orange
2 eggs
150ml sunflower oil
200g grated carrots

For the icing:
100g soft butter
300g cream cheese (full fat)
100g icing sugar
1 tsp vanilla essence

you will need a 12 hole muffin tin

1. Preheat your oven to 180c or gas mark 4 and line your muffin tin with cupcake cases. In a large bowl mix the flour, sugar, mixed spice, bicarb of soda and orange zest together. 

2. Measure the oil in a jug and then whisk the two eggs into it. Add this mixture to your dry ingredients in the bowl and combine.

3. Add your grated carrot and orange juice and mix well (carrot cake mixture does not photograph well so I will spare you the off putting picture!)

4. Divide your mixture between the cases and bake for 20-22 minutes until a skewer comes out clean when inserted into the cake. 


5. Make sure your butter for your icing is super soft and then mix all the icing ingredients together. Your icing should look like this:


6. Once your cakes are completely cool, smooth your icing over the top using a knife. I then decorated my cupcakes with edible glitter (my new baking obsession!) and fondant carrots.


Happy baking xxx

Friday 14 June 2013

Bee Cookies

So anyone who read my royal icing - a beginners tale post will know that I recently attempted to decorate cookies with royal icing for the first time. For some reason best known to myself I decided to try decorating a bee cookie. I think I was inspired by how lovely these bee cookies looked on the sweet adventures of sugarbelle blog. Whilst it was probably a bit of a complicated cookie for a first time it did provide lots of opportunity for me to practice my technique. Sugarbelle has a enviably large collection of piping tips, icing bags and various pots to mix colours so here are a few tips on how to decorate bee cookies with more limited materials. This is what we are aiming for (I was quite pleased given they were a first attempt!):


Firstly you need to start off with some plain cookies to decorate (I chose gingerbread because they are so tasty!). Then take a pen with edible ink and draw on your design, Sugarbelle recommends you do this for every cookie, but after a few I felt I had got the idea:


Then you begin the icing process, with royal icing you typically use a slightly thicker icing to outline the various shapes and then a thinner icing to fill them in. The technique is called outlining and flooding. Fill your icing bags with pre-coloured icing and then using either a number 1, 2 or 3 tip (wilton) begin outlining you bees. Rest your arm on the edge of the table to steady your hand and try and keep the icing nice and neat:


Leave the outline to dry for 10-15 minutes and then begin to flood your cookies. You can refill your icing bags with a thinned down icing but I thought my icing was thin enough so I saved myself the extra washing up and stuck with the same bags I had used to outline. Whilst your bags are not being used keep them in a glass with some damp kitchen towel in the bottom to stop the icing crusting up. I flooded one colour at a time for ease but to give more dimension you might want to alternate between filling in shapes. Zigzag your icing across the area you want to flood and then tap the cookie to encourage an equal spread, use a toothpick to fill any areas not covered by icing.


Once you have finished icing leave your cookies for a few hours to dry before enjoying them.


Happy baking xxx

Friday 7 June 2013

Royal Icing - A Beginners Tale

So recently I have been admiring lots of decorated cookies on different blogs and decided it was time to give it a go. Cookies are normally decorated with royal icing, which is thick and runny but sets hard and glossy. It is a type of icing I have never ever used before so I was a tad nervous about it. In this post I will share how to make royal icing and some tips and then in my next post I will show you how I got along with decorating my cookies. 

Actually making the royal icing was really easy, you need:


1kg icing sugar
5 tablespoons of meringue powder (buy online)
1 teaspoon of cream of tartar
180 ml of warm water

Note- this makes a lot of icing so if you don't have many cookies to decorate then half the quantities.


Firstly you need to whisk the meringue powder and the warm water for about 30 seconds, then add the cream of tartar and whisk for another 30 seconds. You can use a hand whisk but I  was a tad lazy and used my mixer. Your mixture should start to froth up like this:


Next add all the icing sugar at once to your mixture, change the whisk for the paddle attachment and mix on the lowest setting for 10 minutes. If you have a cover for your mixer then definitely use it here or your kitchen will start to look very christmassy. After 10 minutes it should look like this:


Your icing is now ready to use, make sure that it is left covered by a damp cloth whilst it is not being used or it will get all crusty. 

Royal icing is piped onto cookies so the key thing is to get the correct consistency. Sweetopia (http://sweetopia.net/) recommends a rule where you drag a knife across your icing and then count to see how long it takes for the surface of the icing to become smooth again. If it becomes smooth between 5-10 seconds then your icing is thick enough to outline your cookie. If your icing is too runny then mix in more icing sugar and if it is too thick add more water (drop by drop).

Tips from a first timer:
  • once you have made your royal icing separate it into different pots straight away and colour it using gel food colouring. Don't get over excited like I did and mix your colours as you go along because this does not leave any time for air bubbles caught in the icing to come to the surface (they then pop whilst the icing is drying on your biscuit instead and leave a hole).
  • Making your icing black is very difficult, I found that to turn the icing from grey to black required a lot of colouring which made the icing more runny. If you are planning to colour your icing black maybe add more icing sugar at the beginning in anticipation of this (mine was a bit messy to start with!)
  • Have a square of damp kitchen towel to hand to wipe any excess icing off your icing tip between cookies and some toothpicks to correct mistakes. This saves searching through drawers with sticky hands whilst holding an icing bag!
  • The thinner your icing tip is the neater your lines will be. If you only have one icing tip of each size make sure you assign the colour you will be using the most with the thinnest tip for outlining. 
  • Be organised - sort out all your piping bags and piping tips before you start icing any of your cookies or your kitchen will end up like this:

I'll share how I got along in the next post

Happy baking xxxx